Raksha Bandhan is celebrated on August 24th in India.
 |
Photo by Rajiv Lingayat |
"Rakhi is the physical symbol of the emotions involved with the festival. The emotions of love, affection and care. It is the sentiments that matter on this day and what can be a better expression of the sisterly love than a self made rakhi."
The name 'Raksha Bandhan' suggests 'a bond of protection'. During this special day, brothers make a promise to their sisters to protect them from harm and troubles and the sisters pray to God to protect their brother from all evil.
And, like so many other meaningful gestures the people of India have, this one contains silk and beads!
I created a few rakhi and gave one to Makayla to present to her brother. Another I shall keep for my own brother who is not in contact with our family right now but with whom I hope to re-build a relationship with one day. The last is for my Mike, who would die to protect me.
I took photos of the process as I could not find anything but text instructions on how to create our own rakhi and I know there are other people are like me; extreme visual learners.
What you need;
3 - 20 to 24" lengths of thread, fibers or ribbon. The traditional colors are red and gold, I am using sari silk remnants for my rakhi.
Scissors
12" 24 gauge wire
Beads, buttons, embroidery patches, shisha mirrors, flat backed crystals or stones
Epoxy to adhere the flat back stones
Optional; large holed beads and a clasp
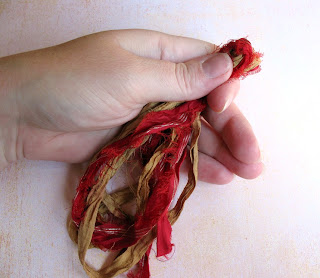
Step 1 - Choose your thread, fiber or ribbon colors and cut them into 3 pieces at 20 to 24" lengths.
Double the strands and then double them up again; you should have 12 strands of approximately 5 to 6" of ribbon or thread. Cut the bottom loops so one end remains doubled and the other has 12 loose strands.
Double the strands and then double them up again; you should have 12 strands of approximately 5 to 6" of ribbon or thread. Cut the bottom loops so one end remains doubled and the other has 12 loose strands.
Step 2 - Gather your threads and hold them together approximately 3/4" from the center. Tie them in a knot or wrap a 4" piece of wire around the top.
Step 3 - Tuck the ends of the wire down into the wrapping so there are no sharp ends.
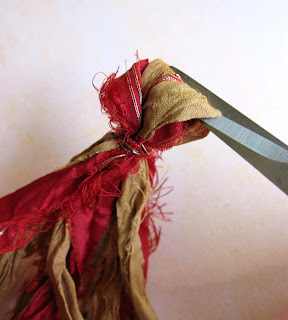
Step 4 - Cut the loop with the scissors and push the separated pieces down. If you are using fine threads, it is recommended to brush them with a toothbrush to make them fluffy.
Step 5 - Slide large holed beads onto the sides of your rakhi if you choose. Knot or wrap them into place.
Step 6 - Plait or braid the rest of the strands and knot the ends. You will need a 4 to 6" length on each side to tie onto the wrist of the man or boy you are placing the rakhi onto. If you have a man child like my own, you know that if he wears his constantly, it will be wrecked within days so I chose to fold my ends over a hand forged clasp, enabling Mike to remove his without damaging the rakhi.
Step 7 - Once the bracelet is complete, you can embellish the center with flat back crystals, stones, buttons or shisha embroidery. Let your epoxy set overnight if you are using it to adhere embellishments to the center. I used a pmc Shiva button for Mike's rakhi, as it is a protective spirit to the people of India, and wrapped it into place with a 4" piece of sterling silver wire.
Step 8 - Offer your rakhi to your loved one and explain its meaning and importance as you place it on their wrist. Bake them something sweet using one of these authentic Indian recipes to go along with their beaded bracelet symbol.
Do you have someone to offer this bond of protection to? They do not need to be a blood brother but anyone who cares for you and makes you feel safe.


No comments:
Post a Comment